
A long search for church media isn’t fun. Finding the right media fast? We can all get behind that.
With Proclaim’s church presentation software, you can easily find and add media to your service presentations, whether you’re looking for a set of slides for a new sermon series, prepping announcements, or keeping attendees’ eyes on the screen during songs.
Here’s how to do it with Proclaim church presentation software.
(If you don’t yet have Proclaim, take a second to download it free and follow along.)
How to find media in Proclaim
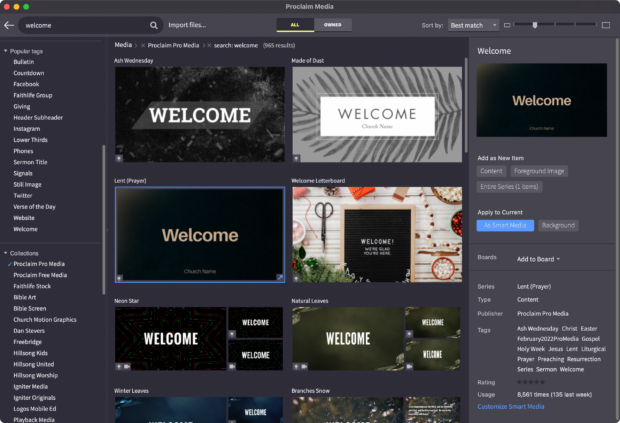
1. Head to the top of your screen and click on Media, then Browse Media.

2. Choose Owned at the top of the screen to limit results to media available to you. (Proclaim comes with 1,000+ pre-designed media templates, but you can unlock thousands more with a Pro Media add-on subscription.)

3. If you’re looking for something specific (e.g., a nursery announcement slide), put a term in the search bar and click the magnifying glass icon to search.

4. Use the filters on the left to narrow results—for example, a specific color scheme or media type.
How to use your selected media in Proclaim
This part’s simple too. Here’s a quick look:
1. For the fastest way to add the media to your open presentation, double click on the media you want to use.
2. For more customization options, click once on the media you’d like to use, then choose what you’d like to do from the menu that appears to the right. The menu items can vary based on which media you’ve selected, but often these are your options:
- Add as new Content item
- Add Series
- Apply as Smart Media
- Apply as background
- Add to foreground
- Customize Smart Media
Tip: Choosing Apply as Smart Media saves you time and keeps your slides looking professional the easy way. All Smart Media in Proclaim automatically formats your text so you can focus on content. The font, size, and color automatically adjust to fit your selected background.
5. Media you’ve added will appear in your presentation. Click on a slide to edit it (text, etc.).
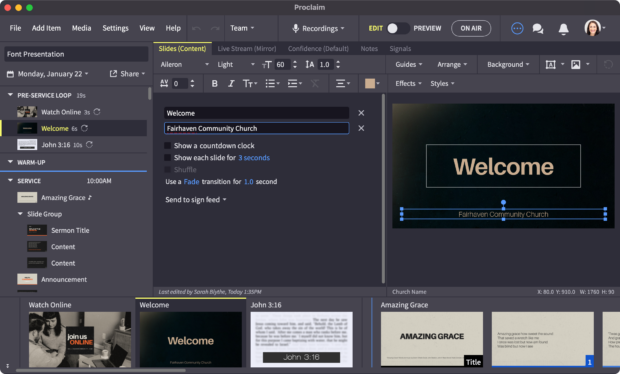
You can also click and drag to move it to a new spot in your presentation or right-click on a media item to see more actions (like duplicate or delete). Since Proclaim is cloud-based, your team can collaborate–for example, your worship leader can add lyrics, your pastor can add sermon slides, and someone else can add announcements.
And if you find a media template you like, you can use the same template for all your other slides by clicking Apply Series. It’s great for when you want to keep all your slides aligned with your church’s branding (not to mention keeping distractions to a minimum).
6. If you’d like to add more media, just go back to the top of your screen and click Media, Browse Media again. That will take you back to your previous media results.
***
If you haven’t yet tried Proclaim, start a free trial now.